Drone Director - Operation manual
V. 4.1 29.10.18
1. Introduction
Welcome to Drone Director. You want to film with your drone at a professional level, but you are lacking a pilot? With Drone Director you can change this. We fly, you film! Thanks to the automatic flight mode, the drone follows your guidelines, so that you can focus entirely on filming. Drone Director can also control your camera so that you can focus on flying. Additionally, you can share your screen and controls with a co-pilot. For further information feel free to check out our YouTube channel.
2. Overriding Drone Director
To start a Flight Mode in Drone Director you have to make sure that your Remote Controller is in F-Mode. Only then, Drone Director will be able to control your Drone. In an emergency switch from F-Mode to a different mode (P-Mode/Sport Mode) to stop flight execution.
Exit/Stop a Flight Mode by clicking the Exit Flight Mode button on the bottom right.
3. Key Features
Copilot:
Livestream the Video feed of your drone to another device. Your copilot can then control the camera, focus, exposure and start/stop filming.
Smart Gimbal:
You no longer have to control the gimbal. Select a target and the camera remains constantly aligned to this point during the flight.
Waypoints:
Create flight routes, which the drone can follow and thus explore the area. Create complex waypoint missions with up to 5 cameras and 99 waypoints.
Auto Line:
Set a focus and a target point. The camera will stay focused on that GPS point, while it passes the point on a straight line towards the target point.
Auto director:
The Drone flies a complete Film.
Pre-flight checklists
A great way to ensure you have all the necessary Information and gear for flying your drone safely. With the build in checklist Drone Director automatically checks information like weather, wind, updates, battery level/status, sd-card, compass, home point and No Fly Zones. To ensure everything works properly when you are flying. Additionally, you can customize your checklist to your own needs.
And a lot more flight modes!
4. Important!
Before Start:
Prior to your first flight, Drone Director needs to be connected to the internet, so Drone Director can be activated by DJI. This process will run automatically in the background and connects Drone Director to your drone.
In July, DJI aircraft firmware will require Drone Director to be activated with the user’s DJI account, if that application is being used in China. The registration and status can be checked in settings.
In order to work properly, only one app at a time can be connected to the Drone. Otherwise, Drone Director will not be able to connect.
Flight Limitations:
DJI Drones have flight limitations in which they can operate. This means that your Drone (and therefore Drone Director) can only operate within a certain area around the home point.
No Fly Zones are built in every DJI Drone and can not be overridden by Drone Director.
Safety:
Drone Director will inform you about detected errors. Take them seriously and do not fly while errors are detected. If an error is detected during flight, make sure to land the aircraft immediately. Fly with caution!
Collision Avoidance:
Drone Director enables collision avoidance when available. When enabled, the aircraft will stop and try to go around detected obstacles.
5. How To Connect
1. Connect the device to the remote controller.
2. Power on the remote controller.
3. Power on Drone.
4. Start Drone Director.
5. If you see a warning "Not Connected!". Please repeat step 1-4.
6. If the there is no live view wait 10 seconds. If there is still no live view try to go to settings and back.
Note: In order to work properly, only one app at a time can be connected to the Drone. Close all other drone apps like DJI Go.
6. General Overview
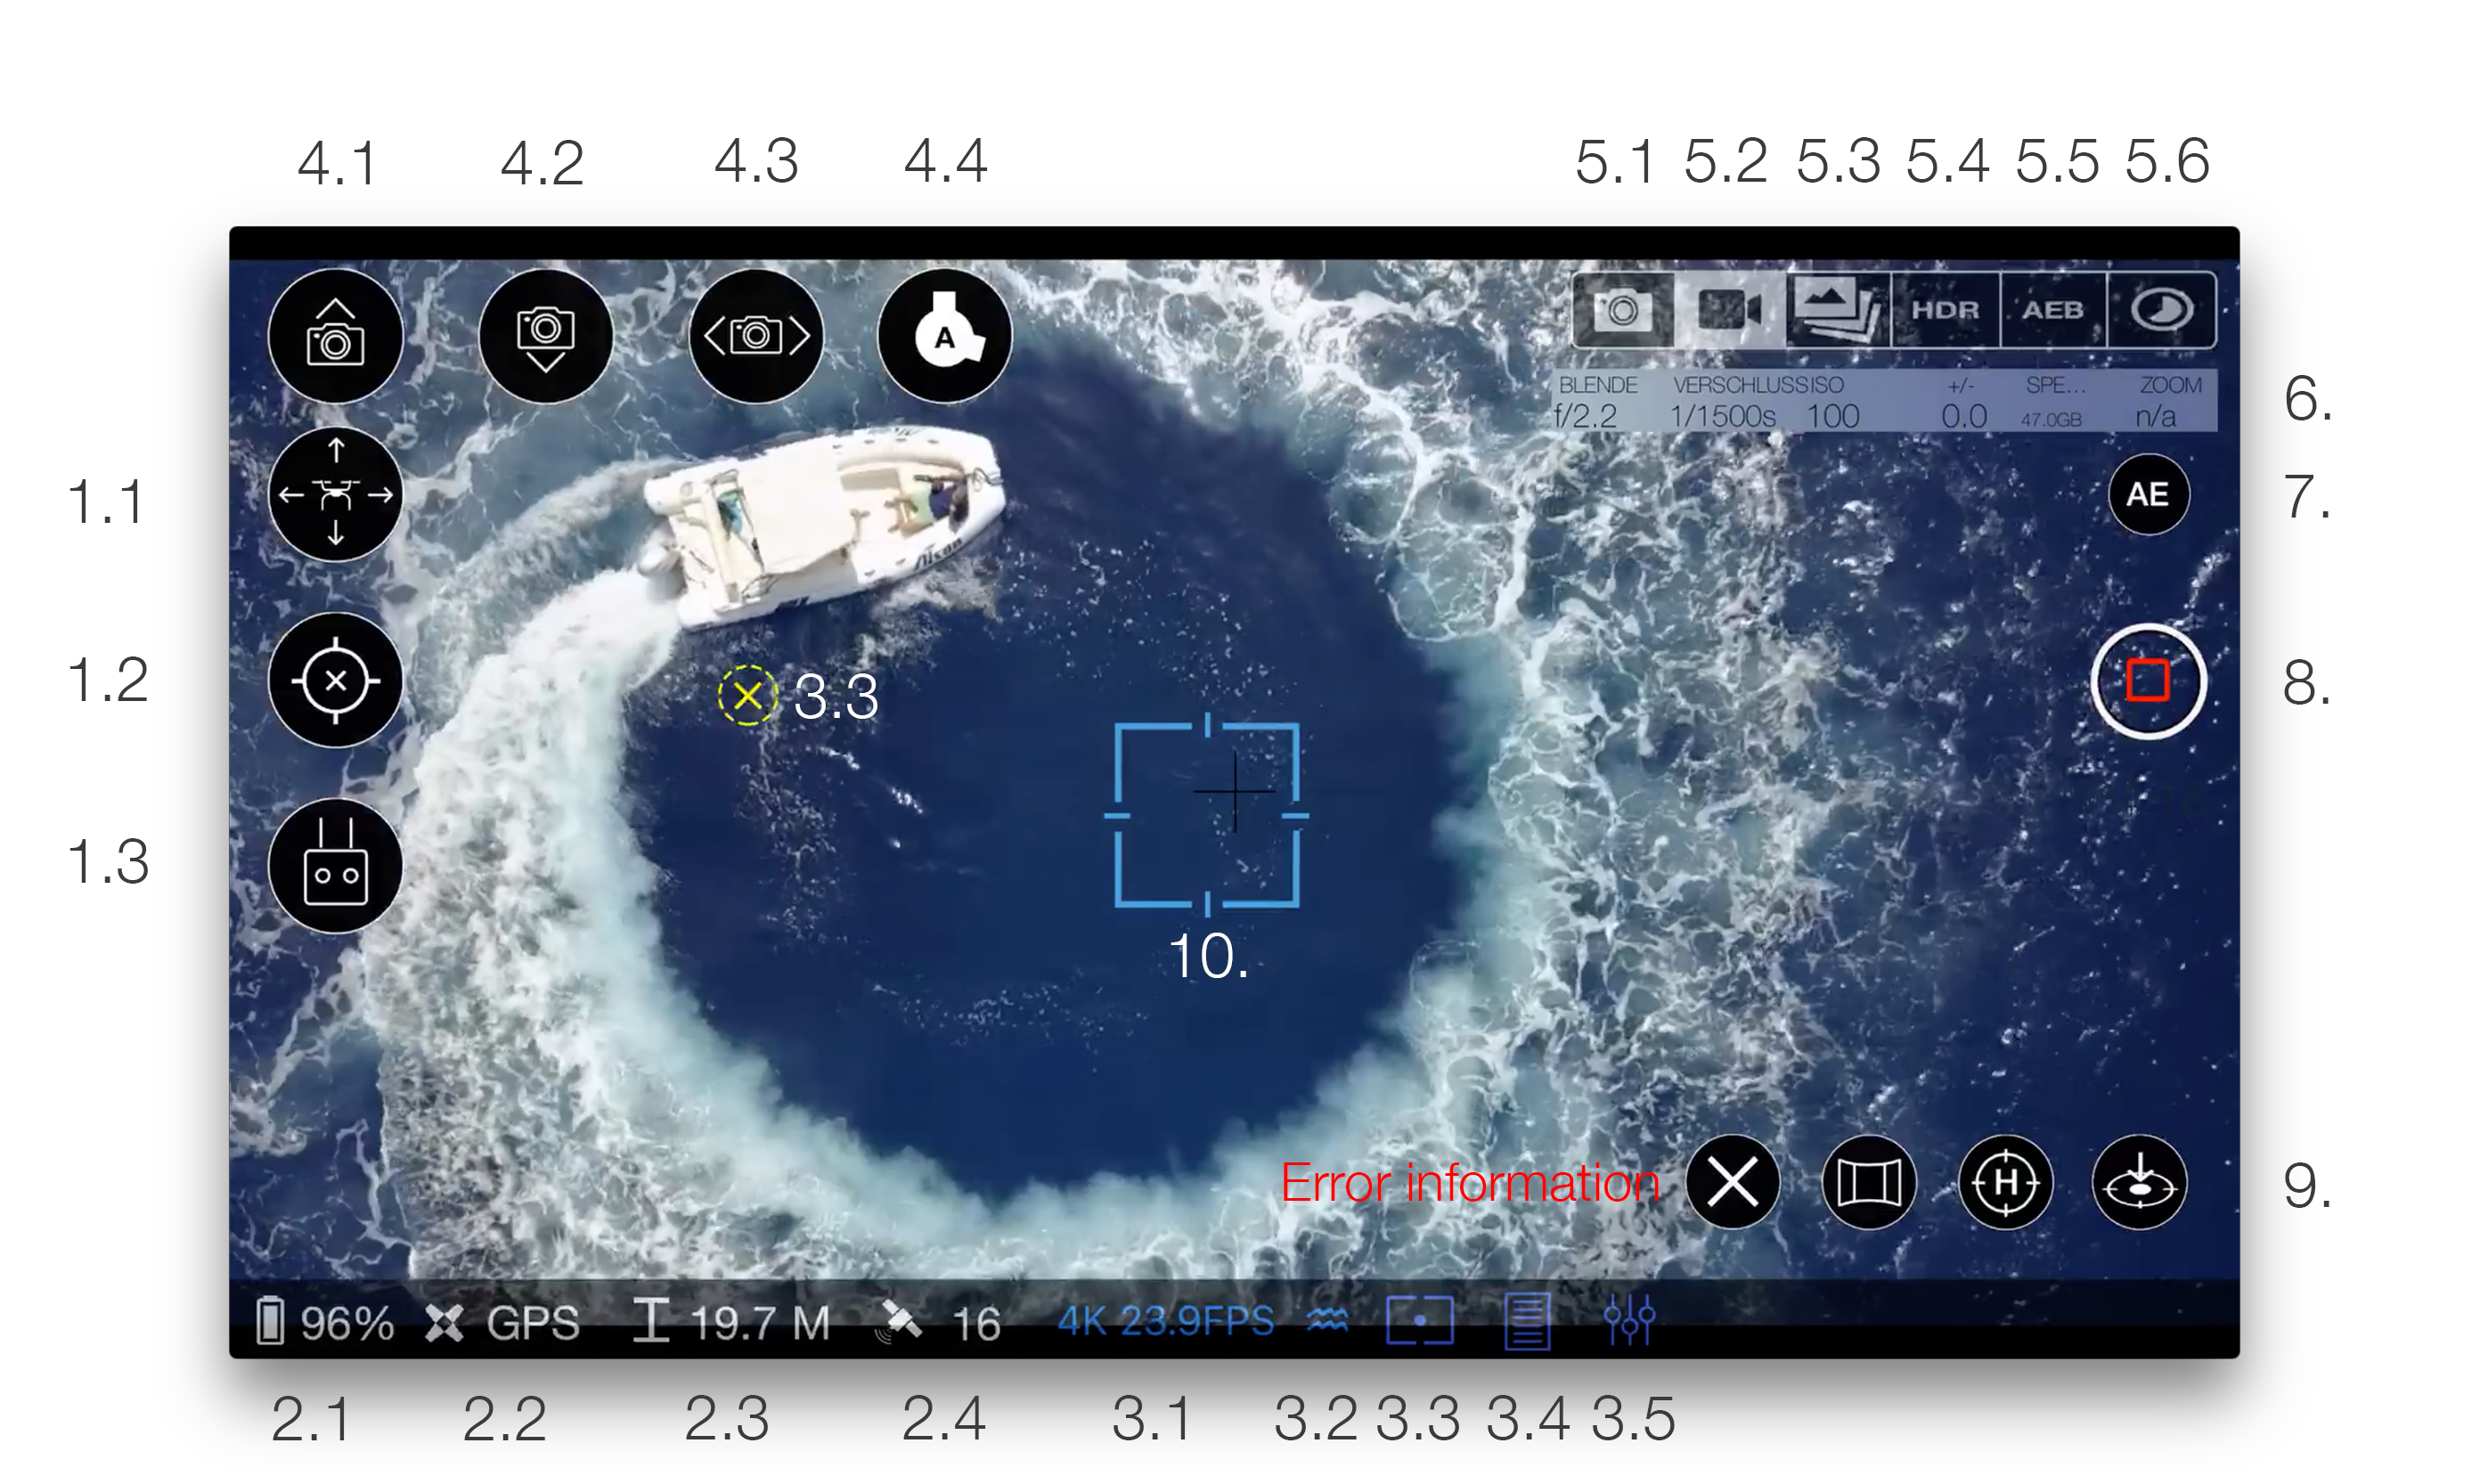
1. Flight Modes
1.1 Stick Modes
Note: To enable custom flight modes the drone must be set to F-Mode! In an emergency switch to another mode to exit the Flight mode and stop the drone.
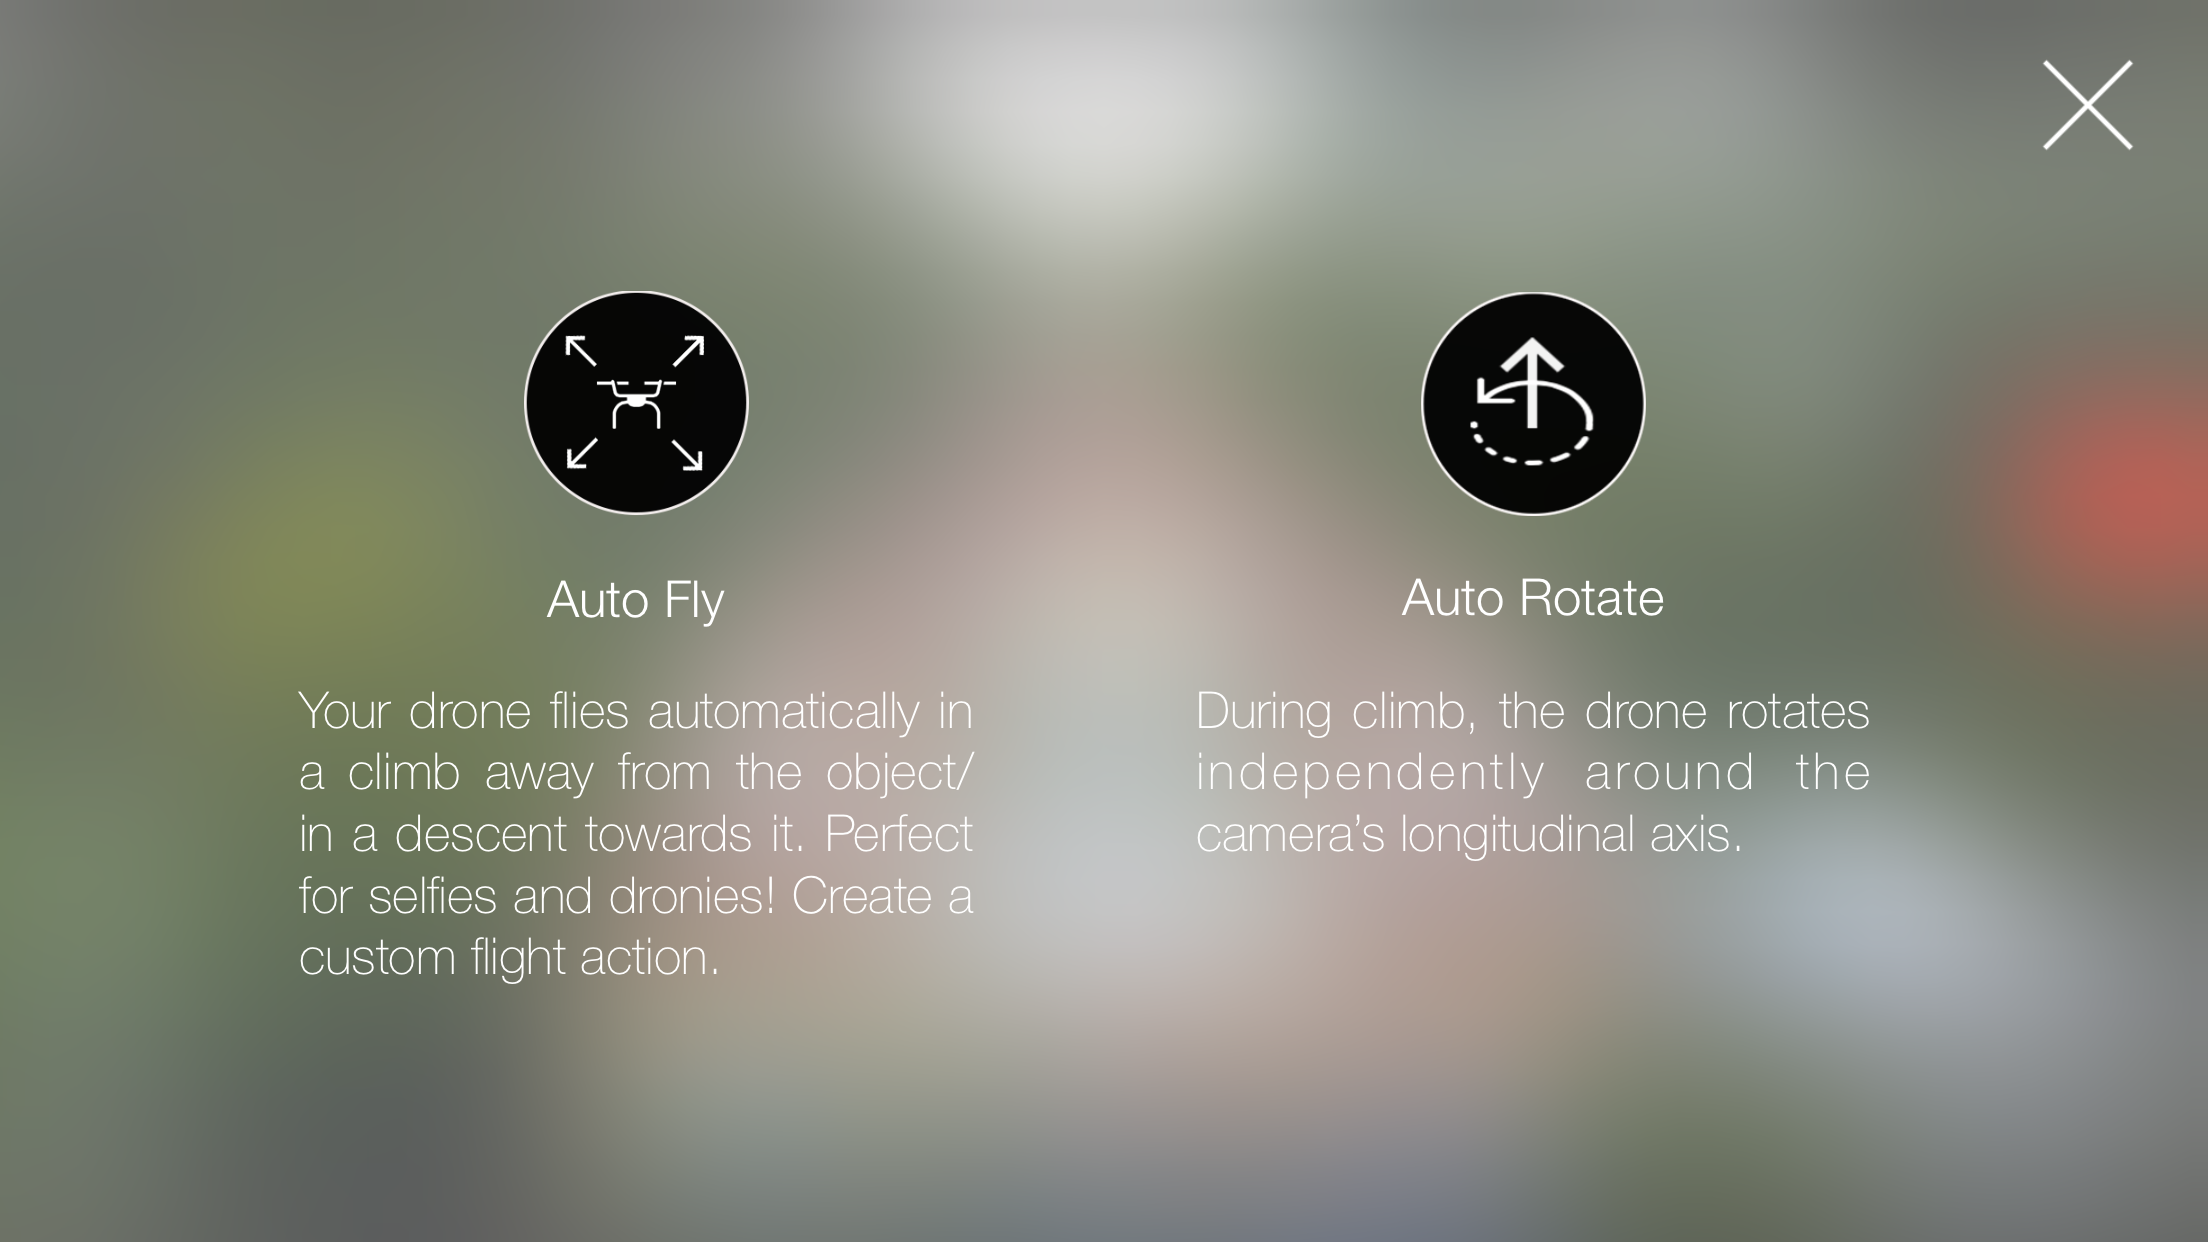
Auto Fly:
 1. Aircraft flies forward rising up.
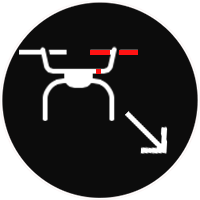 2. Aircraft flies forward descending.
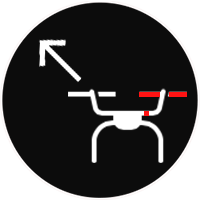 3. Aircraft flies backward rising up.
 4. Aircraft flies backward descending.
 5. Custom Button. Change flight behaviour in settings.
Auto Fly will (by default) fly in a 45° angle this can be changed to 30° or 60° in settings. Flying speed can be changed by the slider on the bottom. If the speed was not changed Drone Director will adapt the Auto Fly speed to the current Drone Speed.
Custom Button flight behavior can be changed in Settings/Auto Fly/Custom Button.
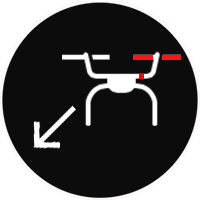
Auto Rotate:
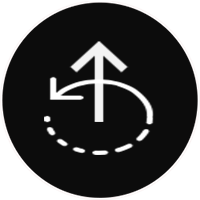
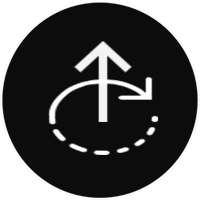 2. Rotates the aircraft clockwise.
 3. Rotation Speed. Can be adjusted by moving the right stick in the horizontal direction.
4. Change the rising up or descending speed. Can be adjusted by moving the left stick in the vertical direction.
Note: For best results should the gimbal face downwards.
1.2 Mission Modes
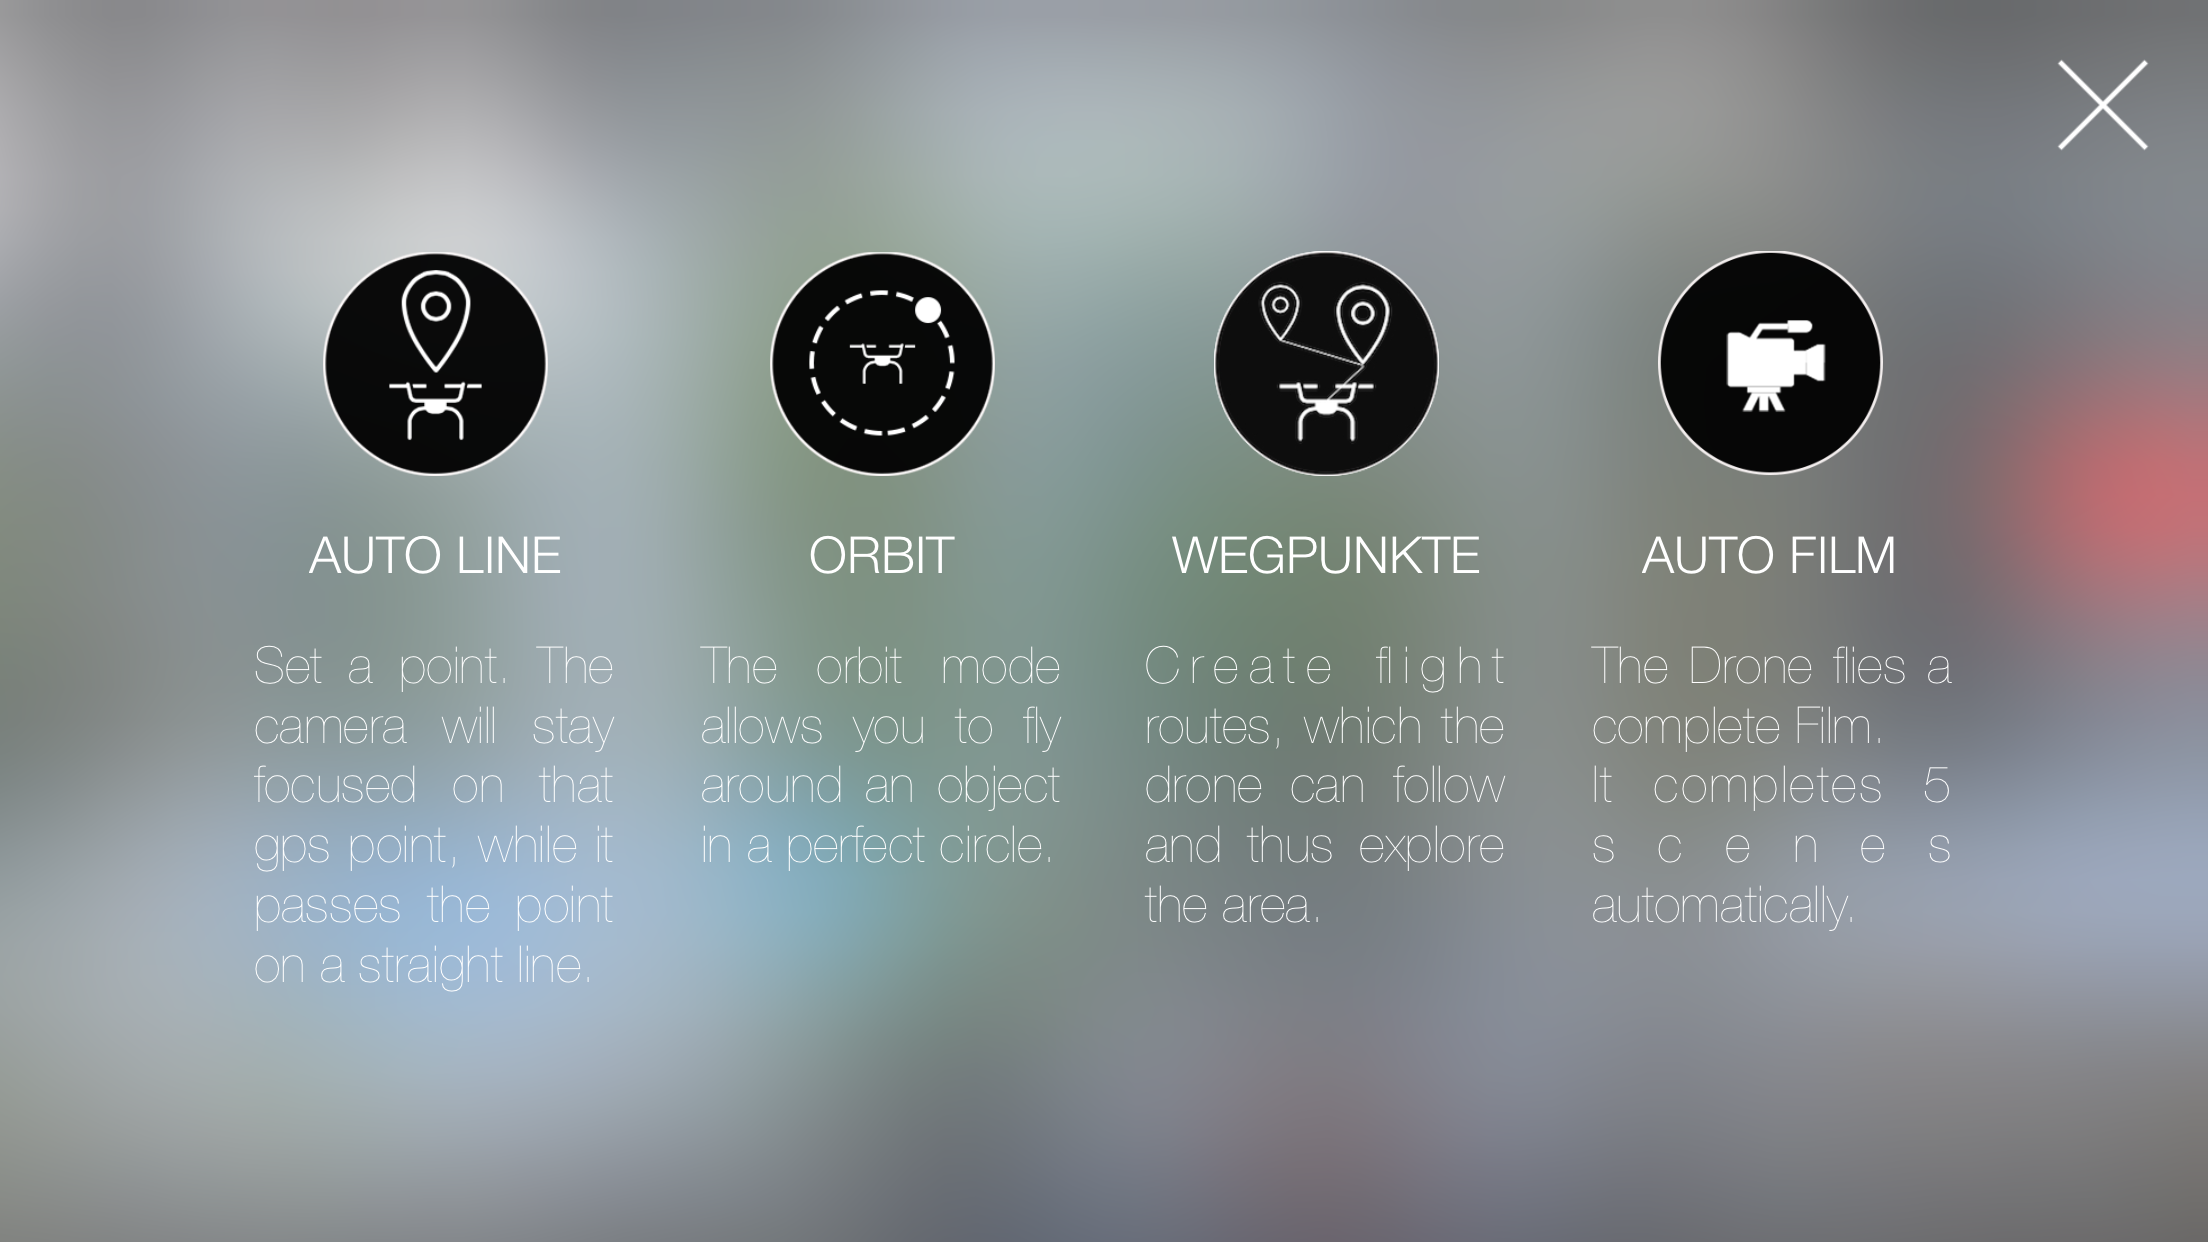
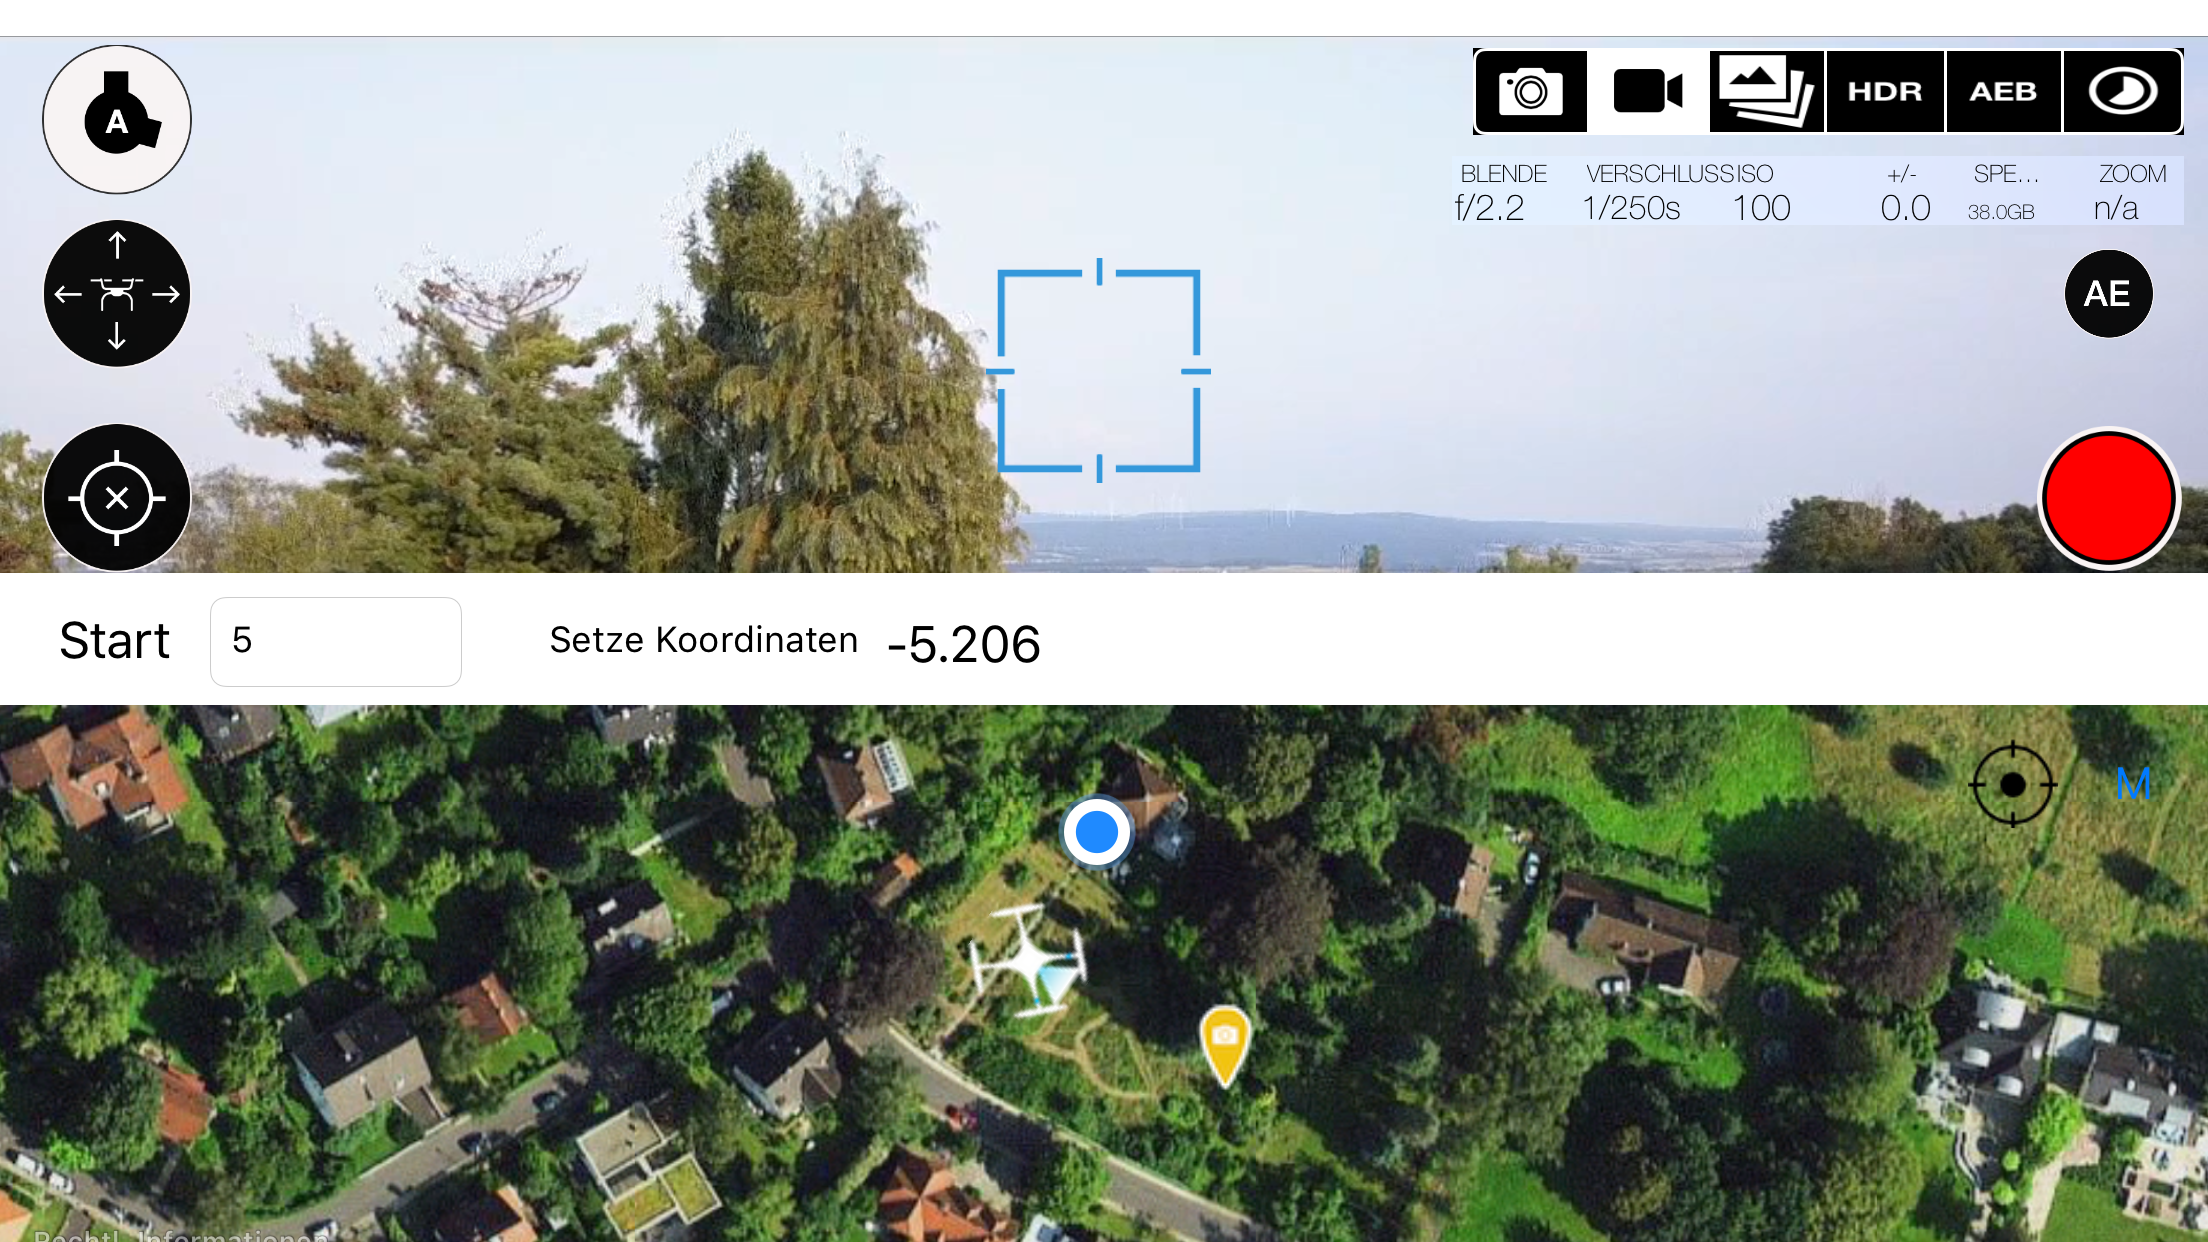
AUTO LINE:
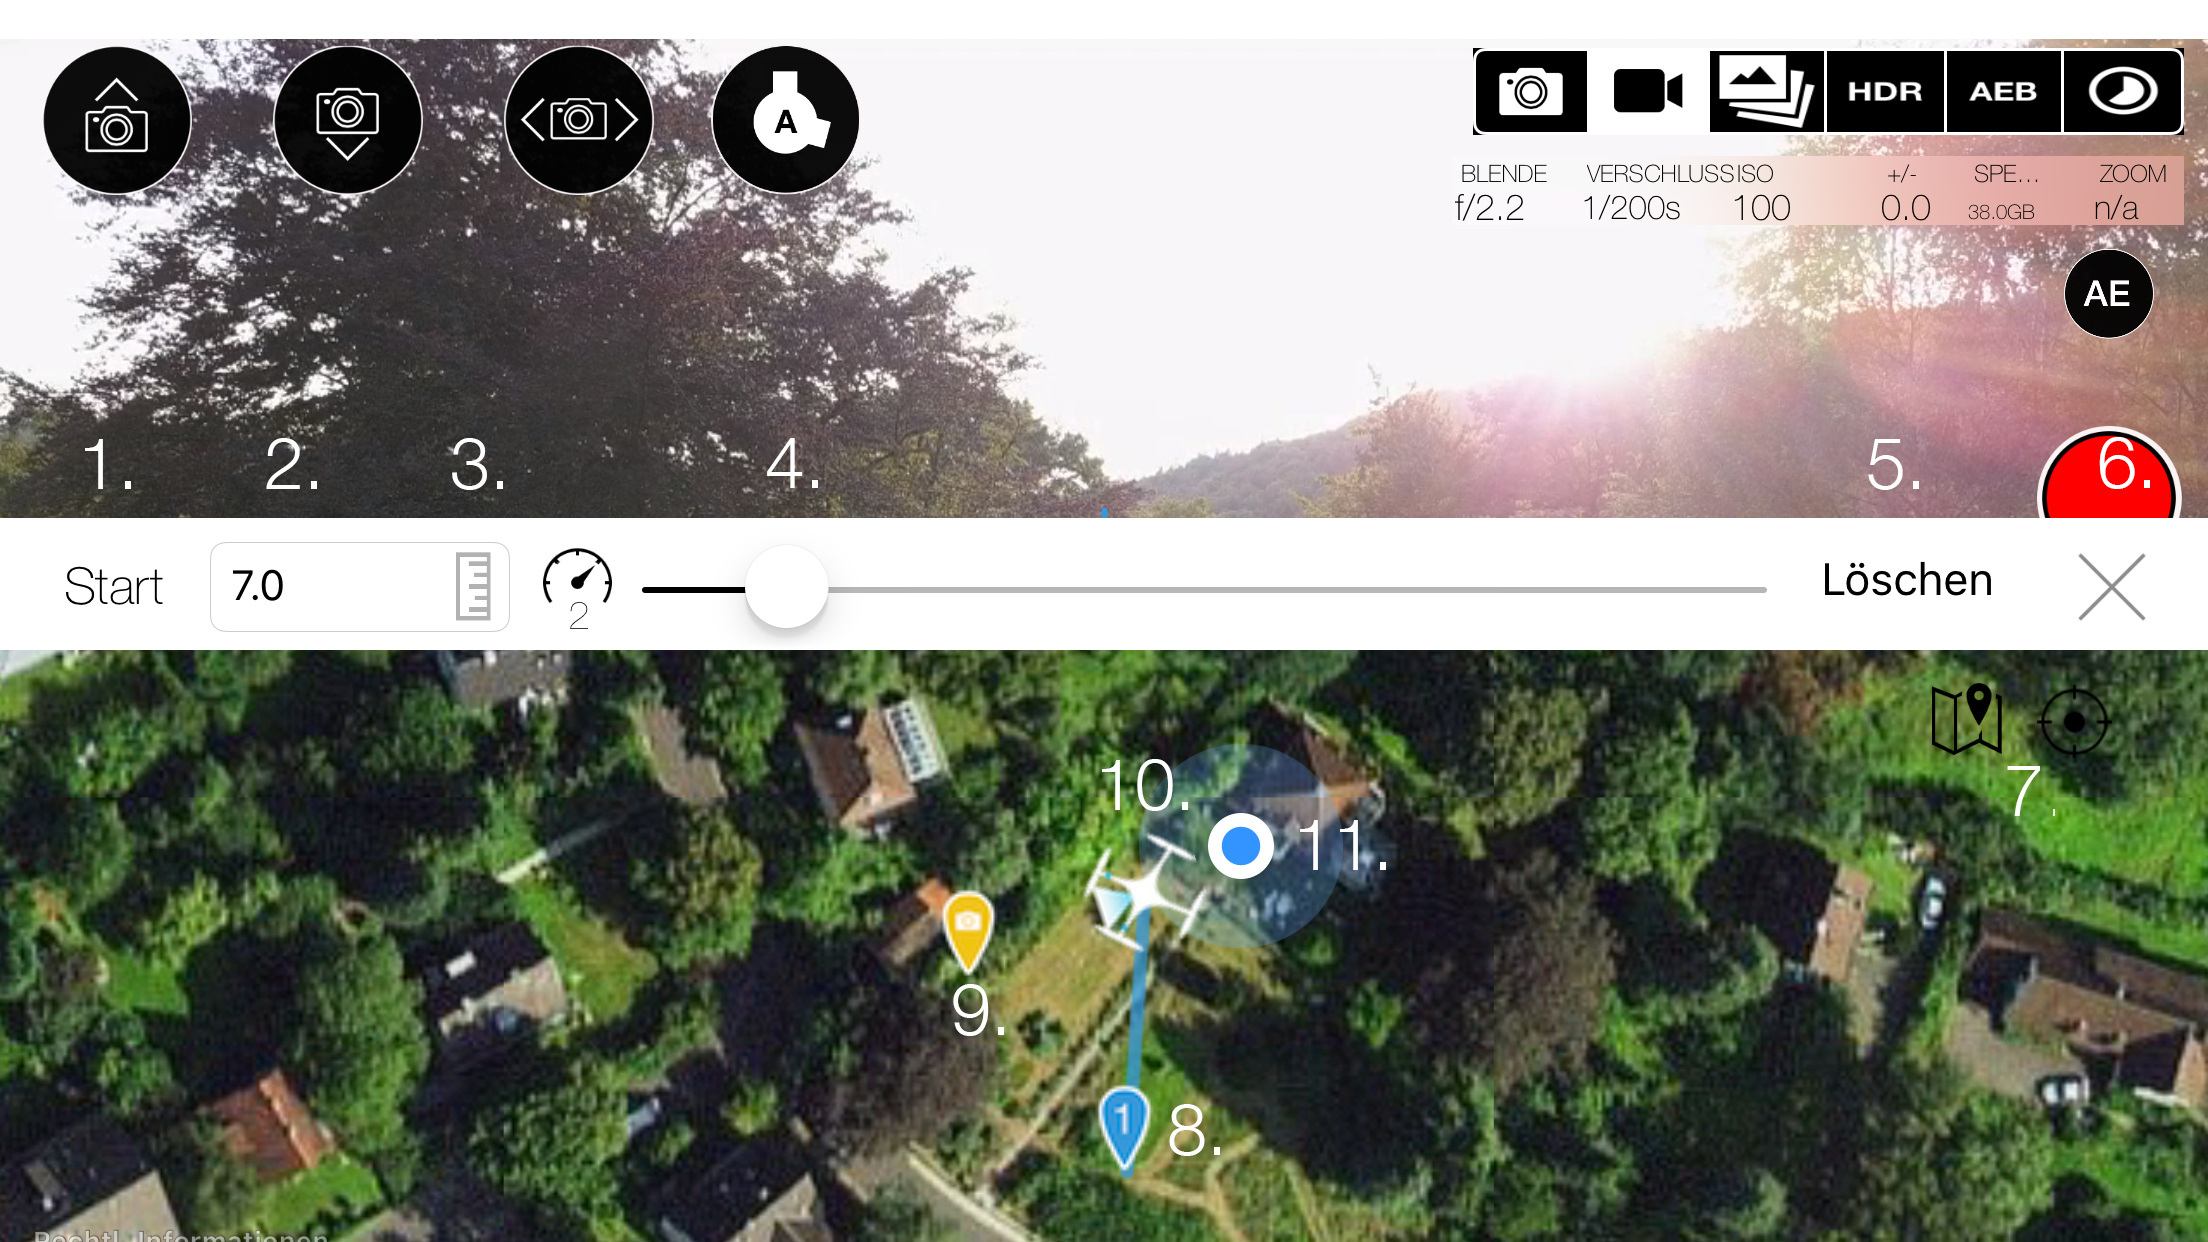
Set a focus and a target point. The camera will stay focused on that GPS point, while it passes the point on a straight line towards the target point.
1. Start/Stop Auto Line mission execution.
2. The Altitude of the mission finish point. Note: When current drone altitude and mission finish execution are different the drone will descent up/down towards the finish point.
3. Set the current drone altitude as finish point altitude.
4. Speed (km/h) of the Auto Line mission.
5. Clear the finish and view point
6. Close the Auto Line window.
7. Switch map between satellite or standard. Zoom map to current GPS position.
8. The drone will fly to this point (finish point).
9. The camera view point. If added the drone will constantly remain focus on this point. If not added can the yaw movement be controled by the remote.
10. The current aircraft GPS position.
11. The device GPS position
Note: Height of the view can be adjusted by dragging the white top bar. Speed can be controlled by the remote controller.
ORBIT:
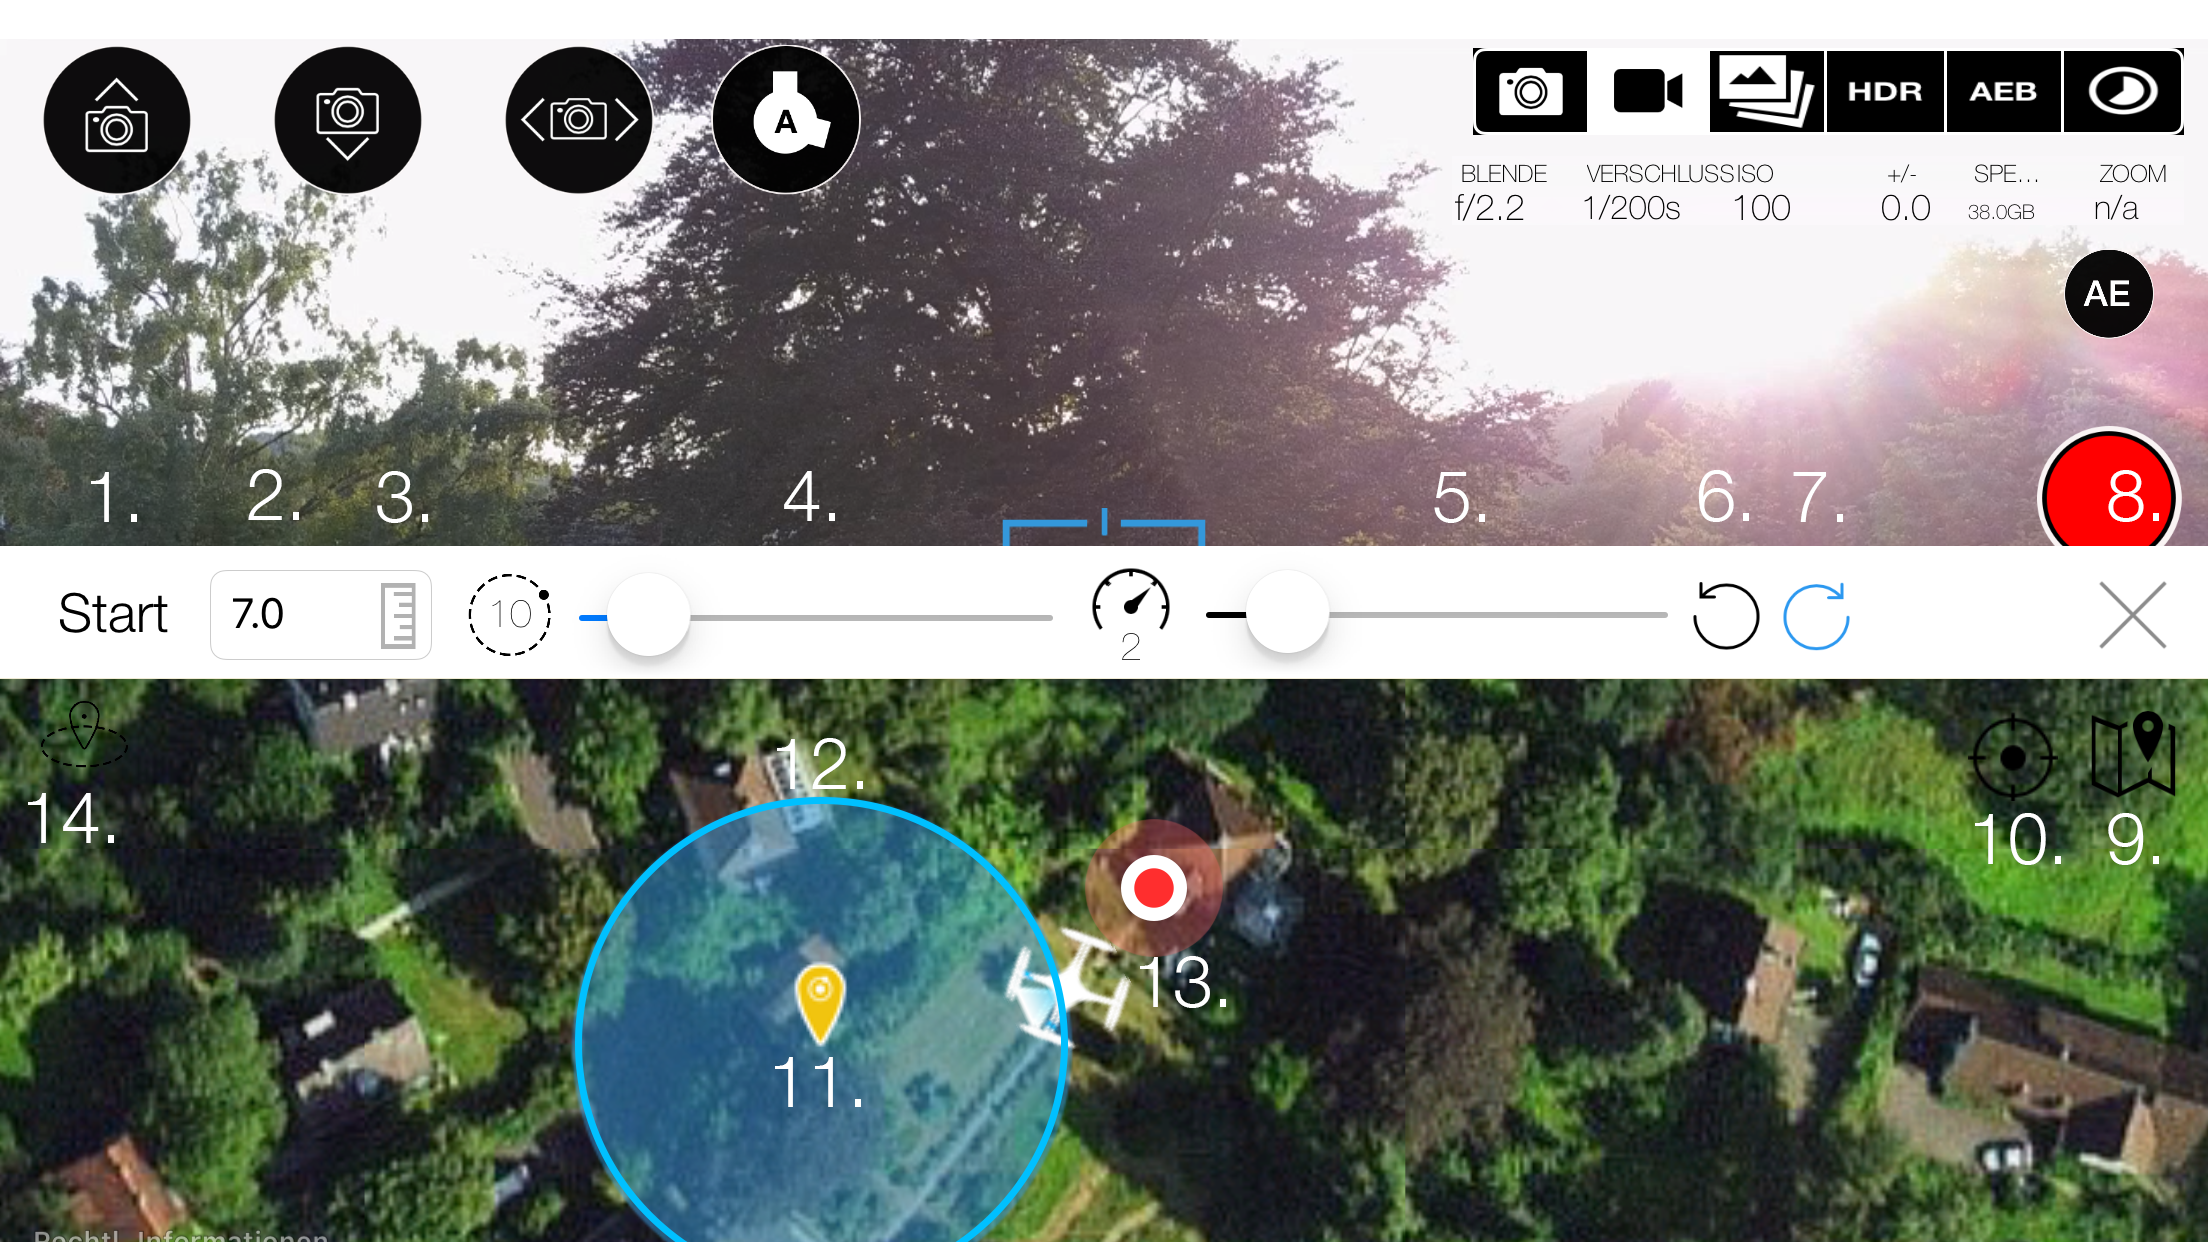
In an Orbit mission, the aircraft will repeatedly fly circles of a constant radius around a specified point called a Hot Point. The user can control the aircraft to fly around the Hotpoint with a specific radius and altitude. When started the center orbit point will be set to the center point the camera is looking at (Quick Shot Mode). To set a manual point Tap the map to add a center point or select a new orbit center point option. You can also drag the center point to a new position.
1. Start/Stop Orbit mission execution. On start, select Aircraft's heading while flying around the hot point. It can be pointed toward or away from the hot point, forward or backward along its flight route, or can be manually controlled by the remote controller.
2. The Altitude in which the drone will operate. [5,500] meters.
3. Set the current drone altitude as as the operation altitude. Sets the distance between the current drone position and the Hot Point as orbit radius.
4. Sets the orbit radius between [5,500] meters. Can be adjusted during flight.
5. Sets the orbit mission speed. (degrees/s). Can be adjusted during flight by changing the slider value or right stick horizontal movement.
6. Counter clockwise flight direction. Can be updated during flight.
7. Clockwise operation flight direction. Can be updated during flight.
8. Close the Orbit window
9. Switch map between satellite or standard.
10. Zoom map to current GPS position.
11. the drone will fly around this Hot Point. Can be added by tapping on the map or 14.
12. The operation radius.
13. The current aircraft position.
14. Set the Hotpoint by current drone/device GPS position or to "Quick Shot Mode" instead of tapping on the map.
15. Fade out option. Chosse between (0s - 10s). Instead of just stopping the orbit flight, Drone Director will decrease speed (over selected time) till the drone stops.
Note: Height of the view can be adjusted by dragging the white top bar. Speed can be controlled by the remote controller.
WAYPOINT:
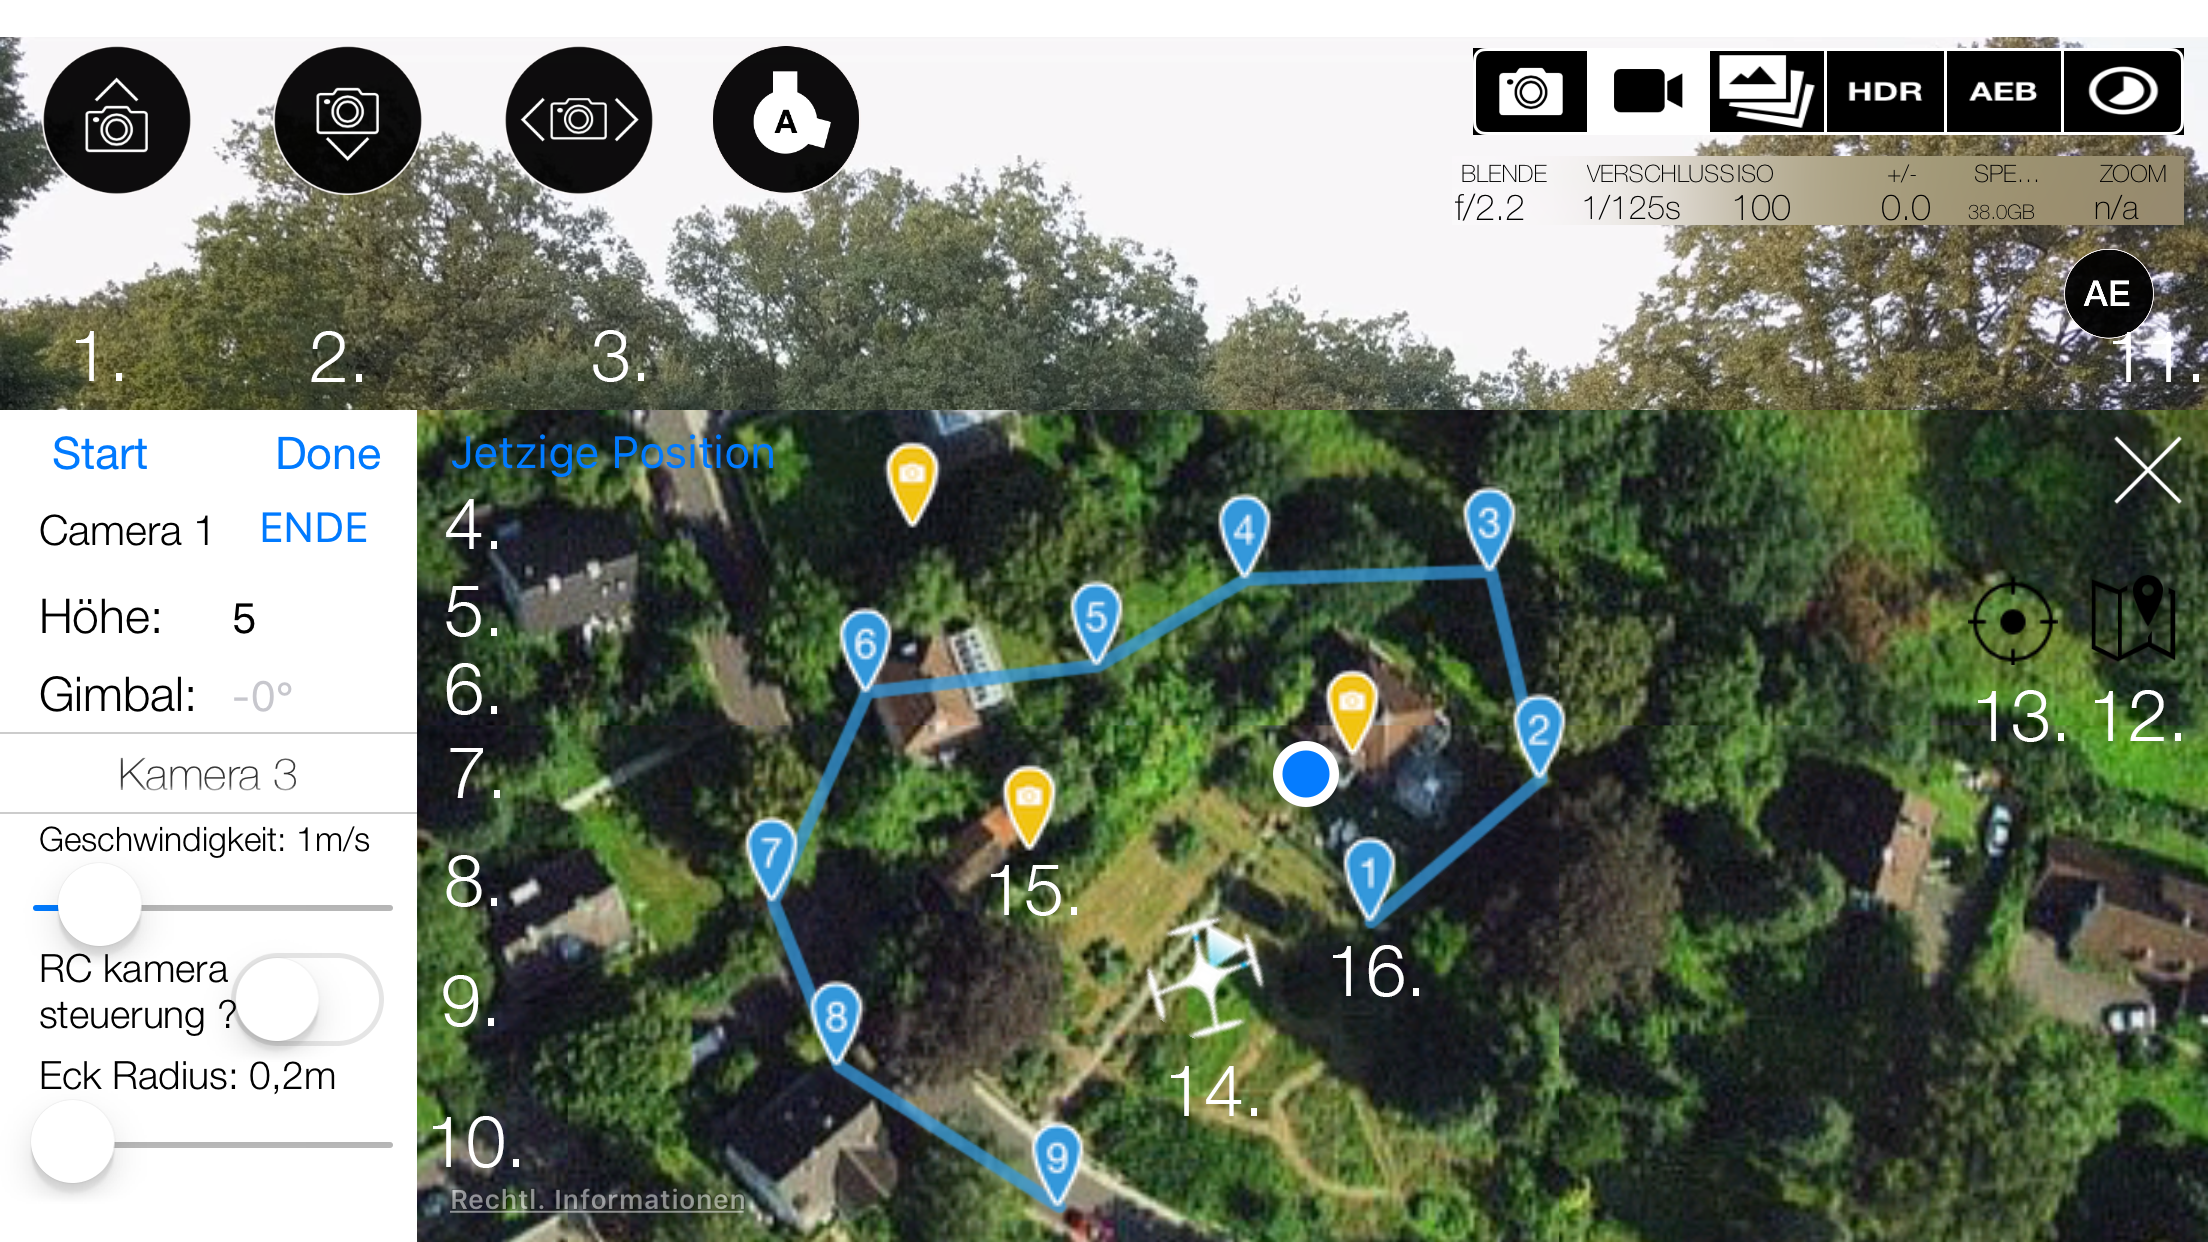
Create flight routes, which the drone can follow and thus explore the area. Create complex waypoint missions with up to 5 cameras and 99 waypoints.
1. Start/Stop Waypoint mission. On Start, the drone will fly to the first waypoint.
2. Select edit to enable camera points/waypoints adding. Tap the map to add camera points/waypoints. Drag points to change their position.
3. Add a camera point/waypoint to the current aircraft position. If point editing is disabled you can save or load your waypoint missions. By clicking "Load" or "Safe". This way you can pre-plan missions.
4. Select a finish action when the waypoint mission is over.
- None: No action.
- Go Home: Flyes to home point.
- Auto Land: Lands the aircraft on the last waypoint.
- Go to First Waypoint: Flyes to the first waypoint
- Continue: Will repeat the waypoint mission until the user stops the execution. (1.)
5. Set the waypoint altitude. This is the altitude the aircraft will cross the waypoint. You can change this for every waypoint individual.
6. Set a certain gimbal degree to a waypoint. The user can control the gimbal by RC or Gimbal Modes (4.) if leave blank
7. Shows which camera is associated to the selected waypoint.
8. Sets the waypoint mission speed.
9. The aircraft yaw can be controlled by the remote controller if enabled. The drone will not align towards the added camera points.
10. The flight path near a waypoint will be a curve (rounded corner) with radius [0.2,2.5]. When there is a corner radius, the aircraft will never go through the waypoint. By default, the radius is 0.2 m.
11. Close the Waypoint window.
12. Switch map between satellite or standard.
13. Zoom map to current GPS position.
14. The current aircraft position.
15. Camera point. If RC is disabled (9.), all associated waypoints will align to this point. Add up to 5 Camerapoints. Drag a camera point to change its position.
16. A Waypoint. Here the Starting point. Click on a Waypoint to edit height/gimbal degree/corner radius individual. Drag a waypoint to change its position. Add up to 99 Waypoints.
Note: Height of the view can be adjusted by dragging the white left bar. Offline maps can be enabled in settings.
AUTO FILM:

The Drone flies a complete Film. In three steps you achieve the perfect result
1. Set a motive, which will be the center
2. Define a radius around your motive
3. Choose a starting point
Finished! The Drone will now automatically film an entire film (5 Scenes)
1. Start/Stop Auto Film mission execution.
2. The height of the object to film.
Warning: The drone will closely operate above this altitude.
3. Set the current drone altitude as the motive height.
4. Maximum altitude to fly. Standart is 50m.
5. Change the Speed of the Auto Film mission.
6. Instead of tapping on the map to add points. Center Point, radius point, and starting point can be added to the current drone coordinates.
7. Delete the added points.
8. Close the Auto Line Window.
9. Switch map between satellite or standard.
10. Zoom map to current GPS position.
11. Center point. This will be the motive of the film. Can be added by tapping on the map or "set coordinates".
12. Radius point. The Drone will operate at this distance to the center point. Warning: Be sure that the drone operates far enough from the motive.
13. Sub points. The Drone will fly to these points during flight.
14. Starting point.The Drone will start and end mission here.
15. The current aircraft position.
Offline Maps
When a map is loaded, Drone Director tries to cache the map. To use cached maps, go to settings and enable "Use cached maps". To delete cached maps select "Delete Maps".
Note: Only maps that have been viewed with an active internet connection, can be loaded.
1.3 Controller Modes
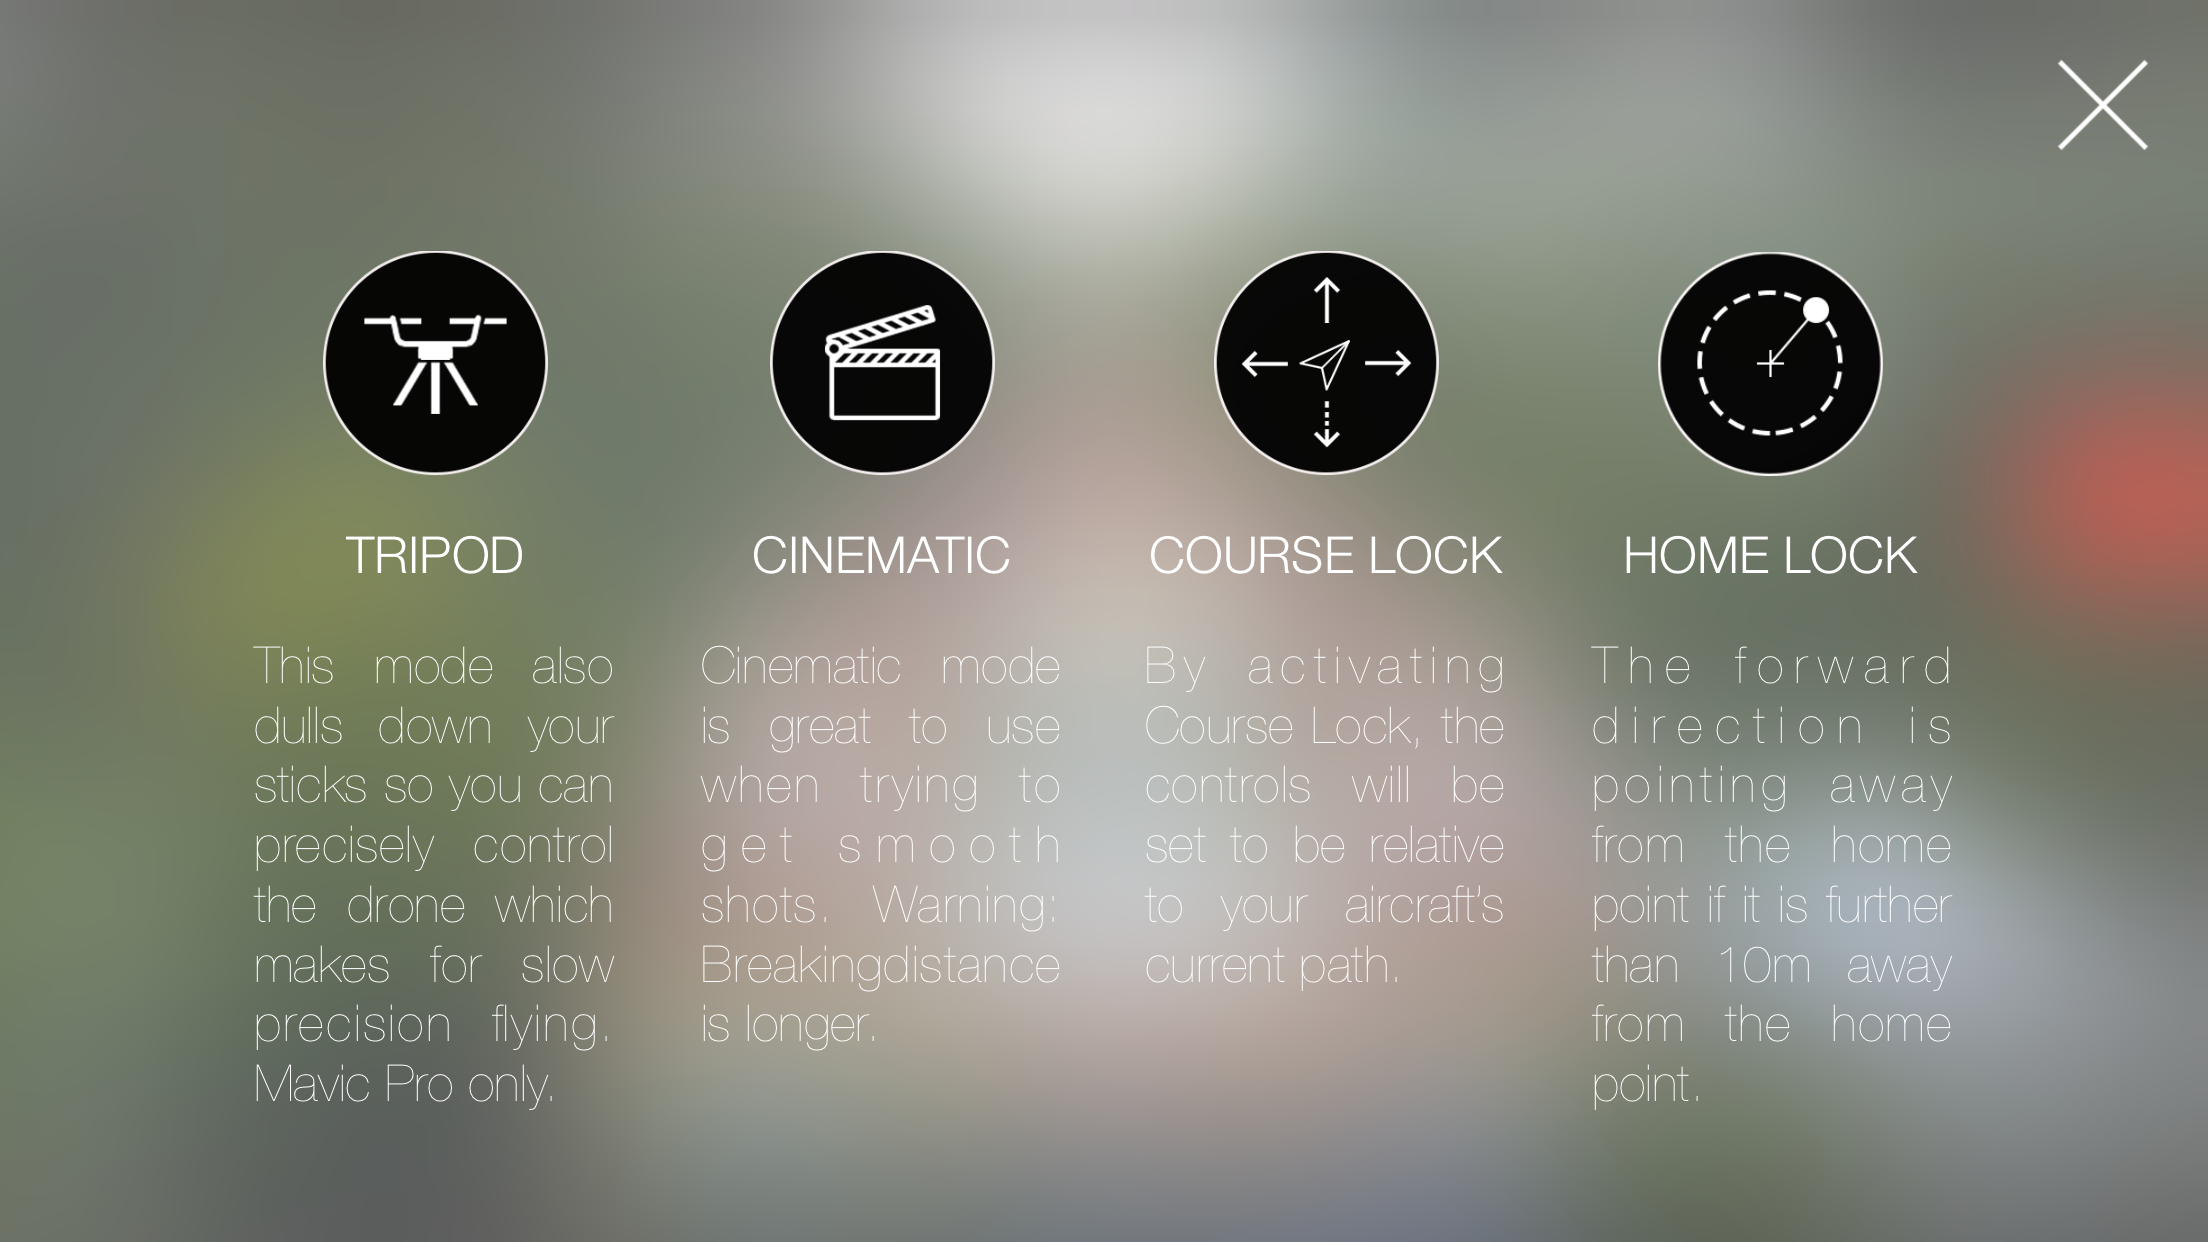
Tripod:
Tripod will reduce the stick sensitivity for smoother controls over your drone. (Mavic Pro only.)
Note: Use the exit flight modes button to exit this mode.
Lock Mode:
Lock Mode locks the current flight behavior and will keep it. Stick controls can then be released while the aircraft will keep moving.
Note: Must be set as a Quick Action in Settings.
Course Lock:
Sets the aircraft flight orientation relative to the Aircraft Heading, Course Lock, or Home Lock. See the Flight Controller User Guide for more information about flight orientation.
Note: Use the exit flight modes button to exit this mode.
Home Lock:
Sets the aircraft flight orientation relative to the Aircraft Heading, Course Lock, or Home Lock. See the Flight Controller User Guide for more information about flight orientation. The aircraft should move relative radially to the Home Point.
Note: Use the exit flight modes button to exit this mode.
2. Flight Information
2.1 Battery
2.2 Flight Mode
2.3 Altitude
2.4 Satellites
3. Camera Settings
3.1 Camera Resolution and Frame Rate
3.2 White Balance
3.3 Exposure metering
- Average: The camera's exposure metering is set to average.
- Spot: The camera's exposure metering is set to a single spot.
Press and Hold on the screen to set the exposure metering to this spot. A small yellow cross will indicate the exposure metering spot. You can click the cross to switch back to average exposure metering. Attention if you press longer than 0.4 seconds you will set the Focus (11.).
- Center: The camera's exposure metering is set to the center.
3.4 Flight Checklists
A great way to ensure you have all the necessary Information and gear for flying your drone safely. With the build in checklist Drone Director automatically checks information like weather, wind, updates, battery level/status, sd-card, compass, home point and No Fly Zones. To ensure everything works properly when you are flying. Additionally, you can customize your checklist to your own needs.
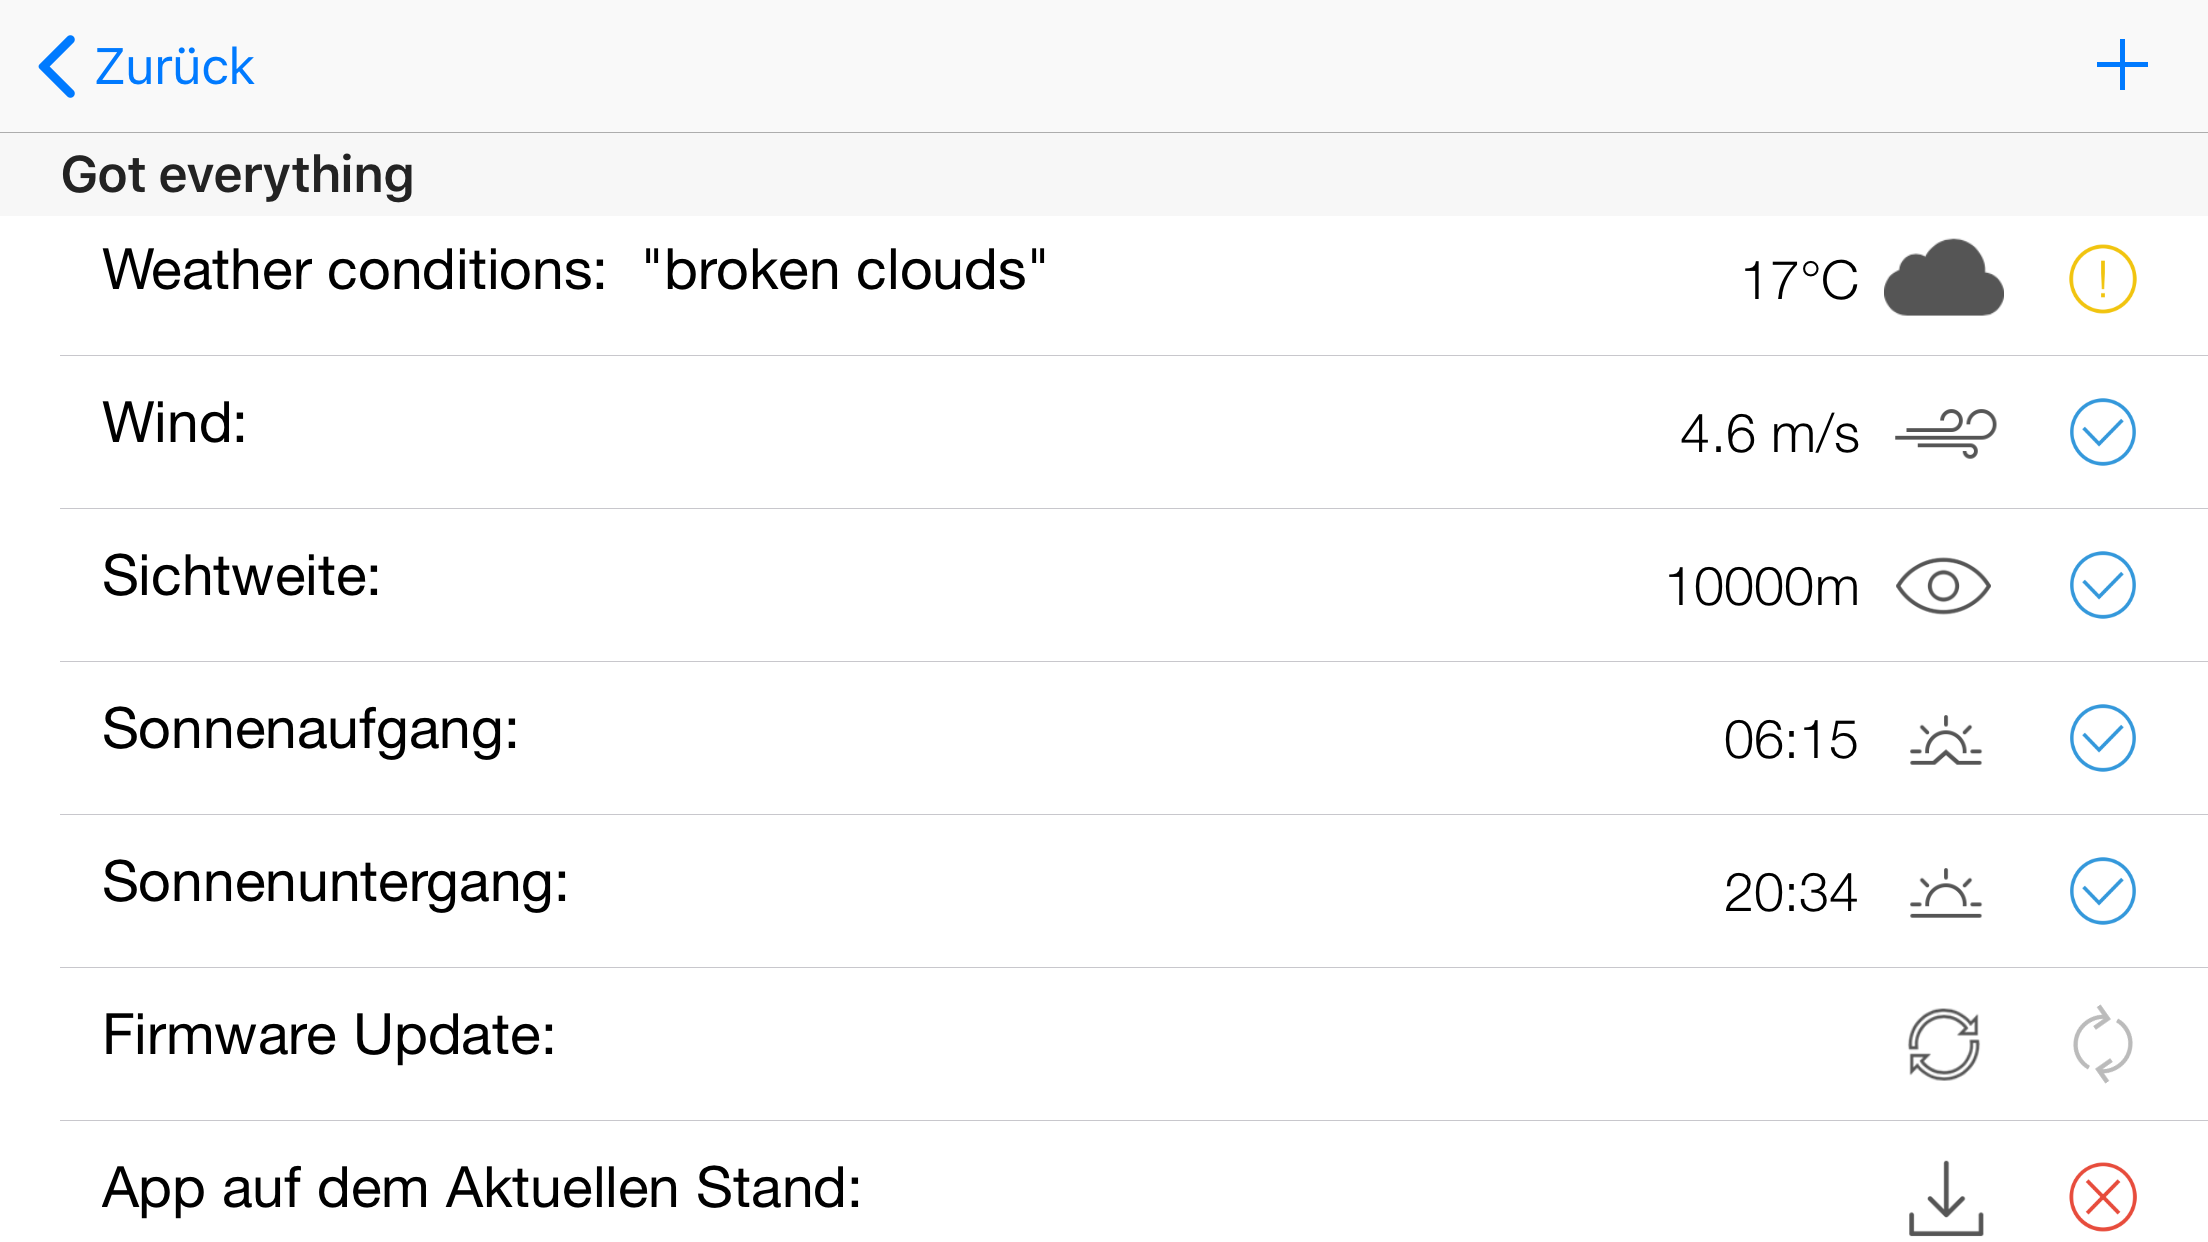
There are 3 different checklists:
- Preparation
- Before Flight
- After Flight
Connect to drone first. Drone Director will then check the status of the drone automatically. For weather conditions, an internet connection is required. Tap the rows to mark it either with a check, warn or error sign. In the top right you can add your custom items to the checklist.
3.5.1 Find My Drone
Drone Director will automatically safe the position of the drone. In an emergency/connection lost the drone can be located this way.
When holding the device landscape a map with the drone position is shown. In portrait drone director shows a compass towards the drone position.
3.5 Settings
Not ready yet!
4. Gimbal Modes

4.1 Camera Up
Smoothly rotate the camera upwards automatically. Speed can be adjusted by the slider. Can be started/stopped by clicking or pressing C1 on the remote controller.
4.2 Gimbal Down
Smoothly rotate the camera downwards automatically. Speed can be adjusted by the slider. Can be started/stopped by clicking or pressing C2 on the remote controller.
4.3 Gimbal Rotation
Smoothly rotate the camera sideways automatically. Speed can be adjusted by the slider.
4.4 Auto Frame
With Auto Frame enabled your camera will lock on a given spot. When moving the drone, it automatically adjusts the camera to remain the frame.
1. Start/Stop Auto Frame.
2. The difference in altitude to the current spot.
3. Set Auto Frame view coordinates:
- To Current Drone GPS position
- To phone GPS position. This will follow the GPS point if it is moving.
4. Auto Frame view point. The camera will remain focus on this spot.
Note: You can activate other modes while Auto Frame will still work in the background.
5. Photo/Filming

5.1 Photo
Capture mode. In this mode, the user can capture pictures.
5.2 Filming
Record mode. In this mode, the user can record videos.
5.3 Burst
Will shoot multiple images fast. The number of photos taken in one burst shot can be changed in settings
5.4 HDR
Will shoot an HDR photo. X5 camera, X5R camera, XT camera, Z30 camera, Phantom 4 Pro camera, X4S camera and X5S camera do not support HDR mode.
5.5 AEB
Automatic Exposure Bracketing capture. In this mode, you can quickly take multiple shots at different exposures without having to manually change any settings between frames. XT camera and Z30 camera does not support AEB mode.
5.6 Interval
Sets the camera to take a picture continuously at a set time interval. Interval time can be changed in settings. Often used with Waypoint mode.
6. Camera Settings

Tap to open/close settings.
1. Aperture
2. Shutter
3. ISO
4. Exposure Correction
5. SD-Card Space
6. Sharpness [-3,3]
7. Contrast [-3,3]
8. Saturation [-3,3]
7. AE
Locks or unlocks the camera's AE (auto exposure). If the AE lock is enabled, the spot metering area cannot be set.
8. Shoot
Start/Stop video/photo shooting. All modes can be changed under point 5. Photo/Filming.
Recording time will be displayed under the button.
9. Assistant Modes

1. Error: Will inform you about detected errors.
2. Exit: Will stop the current flight mode and bring you back to the menu.
3. Hide: Will hide/show all buttons for a better live view.
4. Pano: Will shoot a Panorama. In settings, you can select between 180° or 360° and the number of photos taken. Click again to stop.
5. Home: The aircraft will start to go home. If going home is executed it will inform you about the current flight status. Attention make sure to set the minimum return to home flying altitude in the Flight Checklist. Click again to stop the automatic return to home.
6. START/LANDING will automatically start/land the drone. Attention make sure that no objects are around.
10. Focus
Press and hold on the screen to set the focus to this point. A haptic feedback will indicate that the focus action got detected. If you press the 5D button focus will be set back to the center. Note that not all drones support changing the focus.
Note: When holding less than 0.4 seconds you change the spot exposure. (3.3)
11. Remote Controller
C1: Starts/Stoppes automatic gimbal up rotation.
C2: Starts/Stoppes automatic gimbal down rotation.
C1+C2: Starts/Stoppes "Lock Mode".
5D: Click to center the focus.
5D: Use the Joystick to change the Focus.
PAUSE BUTTON: Exits flight modes
RIGHT WEEL: Changes different mode slider like speed.
LEFT STICK: Changes Auto FLy and Cycle speed.
RIGHT STICK: Changes Cylce rotation, Orbit and Auto Line speed.
F-Mode: In order to work with Drone Director you have to make sure that your Remote Controller is in F-Mode. Only then, Drone Director will be able to control your Drone. In an emergency just switch from F-Mode to a different mode in order to stop flight execution.
12. Apple Watch
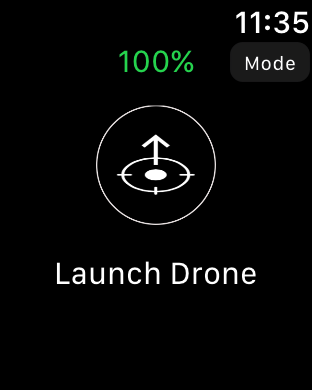
1. Shows the current battery level.
2. Select the "Modes" button to choose a flight mode. This mode will then be activated in the app.
3. Start/Stop current Flight Mode.
4. The label on the bottom informs You about the current flight mode or current error.
13. Copilot

Livestream the Video feed of your drone to another device. You co-pilot can then control the camera, focus, exposure and start/stop filming. In order to use this feature download: "Copilot for DJI Mavic Phantom Inspire Spark".
14. Support
If you have any problems/bugs or want to improve Drone Director please contact us: here